CLICK HERE FOR FREE BLOGGER TEMPLATES, LINK BUTTONS AND MORE! »

Wednesday, November 27, 2013

Treat Boxes


Who doesn't like to get a little something sweet for Christmas?  
I bought these treat boxes at Michael's Crafts (6 for $1.00) in both 
red (close enough to Cherry Cobbler  and green (matched old olive).  
They had printing on the front and back but I glammed it up a bit using my stamps and dies.

These are fairly large boxes that would also hold a small loaf of bread (about 2 x 3 inches).

I used Layered Labels, Tags for You and an old label set 
and Apothecary Accents and Bitty Banners frame-lit dies.
(I Love labels and punches)

I also used the Its a Wrap stamp set to decorate Hershey Nuggets.  
A cute, inexpensive gift!


Monday, November 18, 2013

Wonderful Counselor

We've been making Christmas cards in each class class recently and this is one of my favorites.  Simple, beautiful and keeps Christ in Christmas.  This photo doesn't do the card justice!


The base of the Card is smokey slate
First layer is Midnight muse
glittery layer is Sliver Glimmer Paper (I absolutely love the weight and texture of this glimmer paper.  It comes in silver, champagne and red...Wish they also made it in black)
I used the Deco Labels collection to trim the stamped image

Some midnight Muse ribbon and Frosted Finishes embellishments finish off this card.  Quick, easy and SOOOO beautiful.

Merry Christmas!


Friday, October 25, 2013

Madison Window Fall


I love fall and this card was inspired by the view out a my window at home.  Now, I don't have Oak trees (Maples and pines) but I do have squirrels.  

This uses the Wood-grain embossing Die from Stampin' up
Madison Window Die which I purchased from JOAN'S GARDEN
Various fall stamp sets I had in my drawer

I hope this card inspires you

Stamp the leaves on a neutral color
Cut the window out of a complimentary color
Stamp leaves and acorn, cut out-Viola!

Happy Stampin'
Diana


Monday, September 30, 2013

World Map-It's my 100 post on this BLOG! Whoo Hoo

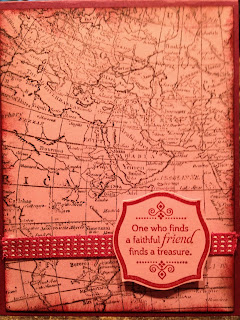
I love this Stamp-World Map, page 23 of the catalog.  The clear mount sells for $13.95.  The first card is stamped on very vanilla and sponged with different colors.  I love this version.

This version is stamped on pink and was my first attempt at using the stamp-it didn't thrill me so that resulted in the card above.  I also stamped on Always artichoke and distressed with Baked Brown Sugar.  I am going to try a very vanilla distressed with brown and black when time permits!

I like to create journals so I think this will make a beautiful Journal cover!  Can't wait to try it
Happy Crafting!
Diana

Friday, September 27, 2013

Happy 80th Birthday to the Man I am fortunate to be able to call DAD

Daddy,
I love you, Happy 80th birthday.  We have shared so many good times as a family and I am blessed to have you as my dad.  Wish we could have another 80 years together but since that is not possible we will enjoy every day, cherish our memories and create new ones!  I love you Dad!

Wasn't he handsome in his (I assume) high school graduation picture?

This is a picture of him holding our youngest daughter who turned 15 in March
She looks to be less than a year old so my dad was around 70 here


Here is the shadow box I made for him.  All photos are color reproductions of the originals (copied on my home printer on to Stampin' Up naturals white and ivory papers.  
The small school photo was taken in 1944, when he was 11 years old

My parents have been married 58 years
That is me (with the bad haircut) holding my younger sister, 
I look to be about 4 years old so that was probably around 1961


Family memories!  Hope you have some


Tuesday, September 17, 2013

Junque

 I collect Junque, which is a higher class of junk than most junk!  I have a hard time throwing stuff away because it might be able to be used in a new project.  To that end, you might call me a hoarder and I am sure my dear husband would agree (he complains about the basement all the time and rightfully so).  It is filled with beads, fabric, yarn, cardboard, broken pottery and jewelry not to mention some leftover furniture and clothing items!

This is a WINE Server that sits in my kitchen made from Junque broken pottery :


This wine cooler is created from a terracotta wine cooler that I have overlaid with broken bits of pottery and some "gem stones".  I glued the pottery pieces to the base using e-6000 and allowed to dry.  Then I filled in the holes using grout (follow the package directions).  I also decorated a plant pot RIM using the same process.  Next time I will have LESS grout between my pieces of broken pottery.

This was also a good stress reducing process, because lacking tile cutters, I SMASHED the pottery with a hammer!  Be sure to wear protective goggles and  place the piece to be broken in a box to.  Then, cover your piece with a towel to contain any random small pieces of glass.

Monday, September 16, 2013

Bats in the Belfry


I once worked in a lab that had a bat terrorize the staff when it's bedroom was disturbed by some overzealous maintenance men, cleaning an air conditioning vent.  I can assure you, he was not nearly as cute as this fellow!  


This card is a 4 X 4 base of ivory card stock, the black accent piece is cut 1/2 inch smaller (3.5 X 3.5) and the festive designer series paper  is 3  x 3.  
The sentiment is from the versatile Teeny Tiny Wishes.  
The bat is made by taking sheer wired ribbon and tying a knot and adding some googly eyes.   Fun!

Happy Crafting!  Diana

Thursday, September 12, 2013

Guest Artist

Last night we had a guest artist, Molly age 10.  She has been attending stamp camp with her mom every time her schedule permits.  Molly is in the 5th grad and attends Liberty Elementary.

This summer Molly was gifted a box of supplies from our supply cabinet with instructions to create at least 5 cards and send them to different people.  She was also asked to be a guest artist at one of our events and here is here card:


Mollie said she was inspired to create her dream cloud card when she first saw the light blue card stock next to the patterned white paper.  She, with the help of her mom, purchased a cloud thin-lit die which cut 3 different size clouds and the DREAM stamp.  The dream is embossed with sparkly blue powder.

 I am sure you'll agree this is a lovely card which can be used for many occasions-baby, graduation, etc.  We look forward to many more cards created by Molly!

Monday, September 9, 2013

Cable Knits

I love fall and am gearing up for an event that my Church hosts-Renewal of the Heart.  This event is held 2 weeks before Thanksgiving, on a Thursday night and includes a high tea, boutique and inspirational speaker.  I have a booth where I sell my paper crafts, wearable art and fiber wear (mostly scarves).  I love the look of the cable knit-seems so complicated but yest SO easy!  If you can knit and perl--you can Cable!

Cast on 16 stitches
The next row is row 1 (wrong side):  Knit 4 stitches, perl 8 and knit the remaining 4*
Row 2:  Knit ACROSS
*Row 3, 5 and 7-repeat row 1
Row 8:  Knit 4 stitches, remove the next 4 stitches to your cable needle and place to the front of your work
knit the next 4 stitches, knit the next 4 stitches from your cable needle and then knit the remaining 4. *

*Repeat this pattern til your scarf measures about 72 inches or the desired length.
END the scarf on the 7th row!!! to have the same pattern on both ends

 This is an easy scarf, only takes me about 2  hours to knit!  Great for those card rides to cross country meets and football games (I even knit during half time!)


and I add fringe (5 sets using 3 strands each)  This color is a beautiful green but looks washed out in this photo.

And I made one using our high school colors teal and black.

Enjoy!
Happy Crafting-Diana

Wednesday, August 28, 2013

Timeless Talk-Hello There


Here is the 2nd card we made in Stamp Camp using Timeless Talk ((126607)
Again, the base is Pacific Point (11350)
The DSP is retired as is the Ribbon. 
The Image is stamped on  So Saffron (105118) using chocolate chip ink 
and cut using the Labels Collection Frame-lits (125598)

Here is the same card with a little added BLING using a couple of flower punches and some glitter glue.


Tuesday, August 27, 2013

Timeless Talk-Happy Birthday

We used the Stamp Set, Timeless Talk (126607, clear mount) page 19 
of the catalog in stamp camp last week to create 3 cards.  
Here is the first one using the Gramophone.  

The base of this card is Pacific Point (11350) and the accent color  is Tangerine Tango (11349)
I used OLD Designer series paper I had on hand in keeping with my New School Year Resolution to USE up some of the things I have stored!  


This stamp set includes a telephone, tricycles in addition to the gramophone, 3 sentiments and a word bubble.  I'll post the other 2 cards in another post shortly.

Happy Stampin'
Diana

Thursday, August 22, 2013

Is it too early?

School started a week ago-August 13th and it is still in the 90s every day...and here I am thinking about Halloween!  I love everything autumn, the colors, the smells, the clothing, Halloween & Thanksgiving...So don't hate me for rushing the season. 

I created these little treat boxes for Halloween using Chinese takeout boxes from Michael's Craft Store (6 for $1.00, what a steal!) 


The labels were created using a variety of stamps 
including but not limited to
Label Love (130622, clear mount $17.95)
Tags for You (131823, clear mount $15.95)
Apothecary Arts Frame lits (127003 $24.95)
Assorted round and scallop punches found on page 182 of the annual catalog


Now please stand on your head to look at the remaining photos-In my files they are right side up but I cannot get them properly rotated for your viewing pleasure!  Go figure.  I posted them anyway so you could see how many different configurations there are for these boxes!   


 Doll these up with ribbons, brads, gemstones and the like, 
fill with your favorite treat and VIOLA!  Instant treat boxes!

Happy Crafting-Diana


Thursday, August 15, 2013

Turning over a new leaf

I have a goal for this blog and it will be to post some new content more regularly-as in weekly!  I hope to get ahead of the curve (inspired to have a storehouse of blog posts after reading Jon Acuffs' book QUITTER, Thanks Jon!)

To that end...here is my first BLOG post in a LONG time. 
 
 This card uses the NEW Wildflower Meadow background stamp and embossing folder.
(Clear mount bundle 132985 and individual components listed on page 83 of the 2013-1024 catty)
 
I used the NEW In-Color Crisp Cantaloupe (paper 131298 and stamp pad 131176)  
and my favorite green Old Olive (stamp pad 126953)
 
I stamped the image twice on Very Vanilla card stock (101650).  The base was stamped with Old Olive and run through the embossing folder.  The 2nd piece was stamped with Crisp Cantaloupe and I used my handy-dandy paper snips to cut out the flowers.  These were mounted on top of the stamped image with Stampin' Dimensionals (300 dots for $3.95, product number 104430) 
 
 
I love the interior of this card almost as much as the exterior.


The sentiment comes from the Feels Good Stamp set (clear mount 129684) and is stamped with the new In-Color Brown Sugar (131174). 
This set has several nice sentiments and I LOVE the font!
The flowers, stamped in Crisp Cantaloupe are from the ever popular Stippled Blossom set (page 69, clear mount 126747).
 
I hope your day is filled with people who bring sunshine into your life!
Happy Stampin'
 
Diana

Friday, March 22, 2013

Swallowtail

I wasn't sure I would like this stamp because of it's large size but I took a chance and purchased it anyway.  After I demonstrated it in a stamp camp I sold 4 of these stamps. 
The butterfly is stamped on card stock with Versamark and then sprinkled with Espresso powder. 
This Baja Blue is my favorite color combination. I made this a 4.4 x4.5 inch card
Tangerine Tango
Daffodil Delight
These are standard card sizes and I like the color combinations as well.
Lastly, I used Gumball green and Rich Razzleberry for this Easter Cards


I'm happy to have stepped out of my comfort zone and used a stamp that I normally would not have.  I fell in love with Swallowtail and I hope you are inspired to use it in some of your own projects


Rain or Shine

Since March traditionally enters like a lion and goes out like a lamb I thought I'd use some products from the
from the New Spring catalogue. 
The card base is the Scallop Circle Bigz Die-cut so the there is a fold, making a nice little card.
I attached a smaller scallop of blue and then
I embossed the Front of the card ONLY with the
CLOUDY DAY embossing folder.
 
The stamp set is Rain or Shine. 
The sentiment was punched our using the scallop oval and mounted on the Extra Large Oval.
 
I stamped the interior with one of the umbrellas and added a couple of more flowers. 
 
Happy Spring!


Friday, March 8, 2013

Calla Lily Card

I totally cased this Calla Lily card
It is made using the ORNAMENT PUNCH
 
TO CREATE THE CALLA LILY'S
Punch 3 ornaments out of whisper white
Edge the ornaments with ink which coordinates with your card stock
(I used some OLD designer paper and tangerine tango)
Using a pencil curl the edges away from you
Pinch the "top" of the ornament (this is the bottom of the flower)
together and secure with Tombow glue
Cut a thin strip of coordinating color for the stamen and glue in place
Allow flowers to dry
Adhere flowers to card base using dimensionals
 
Punch leaves out of assorted green card stock using the bird punch
arrange around your Lily's
Add a decorative bow
Using the Modern Label and word window create a sentiment for the front of the card.
 
Happy Easter!


Friday, March 1, 2013

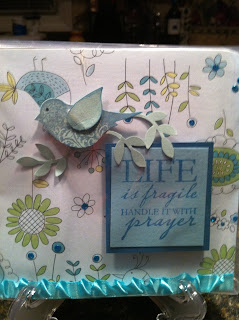
Life is Fragile...Handle with Prayer Journal

 
I didn't have any photographs of my recent cards available so I decided that I would add a Journal I made using the 2 step bird punch in honor of all the robins that are reminding me that Spring is surely near!  Even though it was snowing here this morning!
 
This is a store bought chipboard journal covered with decorative paper.  It's an easy to make gift, taking only about 15 minutes from start to finish. 
 
Line the journal with double sided tape.  Remove tape backing and CAREFULLY place on your decorative paper.  Trim away unnecessary paper and decorate with embellishments of your choice.  VIOLA!  Instant gift.  
 
I sold these beauties at a craft show for $8 and the literally FLEW off the shelf. 
Happy Crafting
Hugs, Diana   

Thursday, February 14, 2013

Sweets for the Sweet!

Here is the CARD I created fro my Dear Husband Gary!
Just a foam board with a message written with candy bars as part of the message.
Here is a larger picture of the CARD!  I didn't have the message planned when I bought the candy so I just let the candy bars dictate the message.
 It reads:
Honey, when we first met you were probably hoping to SKOR. 
We never thought our life could be so NUTTY. 
It's been filled with JOY and some SOUR PATCHES. 
You still send me into ORBIT to the MILKY WAY. 
YOU make my heart BURST and you always make me SNICKER, 
Don't try to make  a FAST BREAK this PAYDAY. 
We were MENTOs be together 
We make a perfect DUO
 
I received this beautiful bouquet, balloon and some Schimmps candy (delicious!) plus a card that brought tears to my eyes!
 
Hope you have a beautiful day filled with LOVE!

Friday, February 8, 2013

Love and Laughter

 
LOVE AND LAUGHTER
The Saint John Caring Card Club was gifted a TON of card stock, ribbon, embellishments and stamp sets recently (Thanks Kathy Williams!) so we put them to good use. 
This ribbon, salmon in color,  is printed with the 1 Corinthians 13 LOVE verse so we paired it with the Love and Laughter Stamp Set for a lovely Wedding Card.   
The card base is Crumb Cake and the accent card stock is chocolate chip.  The sentiment is stamped in Chocolate Chip on Very Vanilla.  Flowers we punched out of scrap DSP and embellished with glitter glue.  Lovely!